
When it comes to web3 , we often focus on the security of the smart contracts and the blockchain layer. It has become an industry standard to get your smart contracts and code audited. While Web3 security often zeroes in on smart contracts and blockchain layers, there’s a dangerous blind spot the Web2 layer. APIs, frontends, and backend servers often go unreviewed, exposing decentralized apps (dApps) to centralized risks. This article explores real-world attacks like web cache poisoning, insecure direct object references (IDOR), and SSRF in the Web3 context. You’ll also get access to live labs for hands-on testing.

The reality is that the Web2 layer within the Web3 ecosystem is also riddled with vulnerabilities, often overlooked during security assessments. While smart contract audits primarily focus on the on-chain components, the off-chain infrastructure — including APIs, frontends, backend servers, and third-party integrations — frequently remains under-audited, exposing the entire system to significant risks.
Following are some of the big hacks where web2 components were compromised to carry out the hacks. This excludes the various phishing and private keys compromise issues. This shows the importance of web2 security.

In this post, we will look at some of the overlooked web2 vulnerabilities in web3 Realm and I have prepared a lab for demonstration purposes.
Cache Attacks:
What is Cache?
Caches play an important role in optimising web performance. It allows certain resources to be stored temporarily in order to limit redundant calls to the backend system and to speed up the response time and delivery time.
There are two type of Caches:
- Private: It is generally stored in the browser and contains elements specific to the user’s session or profile. This type of cache should never be shared, as it may contain sensitive information.
- Shared: It is used to store content common to several users, such as static files and images. This is managed at different levels of infra , via proxies or at CDNs(Content Distribution networks).
It’s important to note that caches are mainly used for static contents
Before diving into the attacks , let’s understand the common cache-control directives used in requests and responses.
Common Cache-Control directives used in Requests:

The client can control cache behaviour for its own needs or intermediate caches. In the following example request, Cache-Control: no-cache tells caches not to use a stored response without first revalidating it with the origin server, ensuring the client gets a fresh or verified copy.
GET /dashboard HTTP/1.1
Host: example.com
Cache-Control: no-cache

Common Cache-Control directives used in responses:
*Reference: https://httpwg.org/specs/rfc9111.html#field.cache-control*
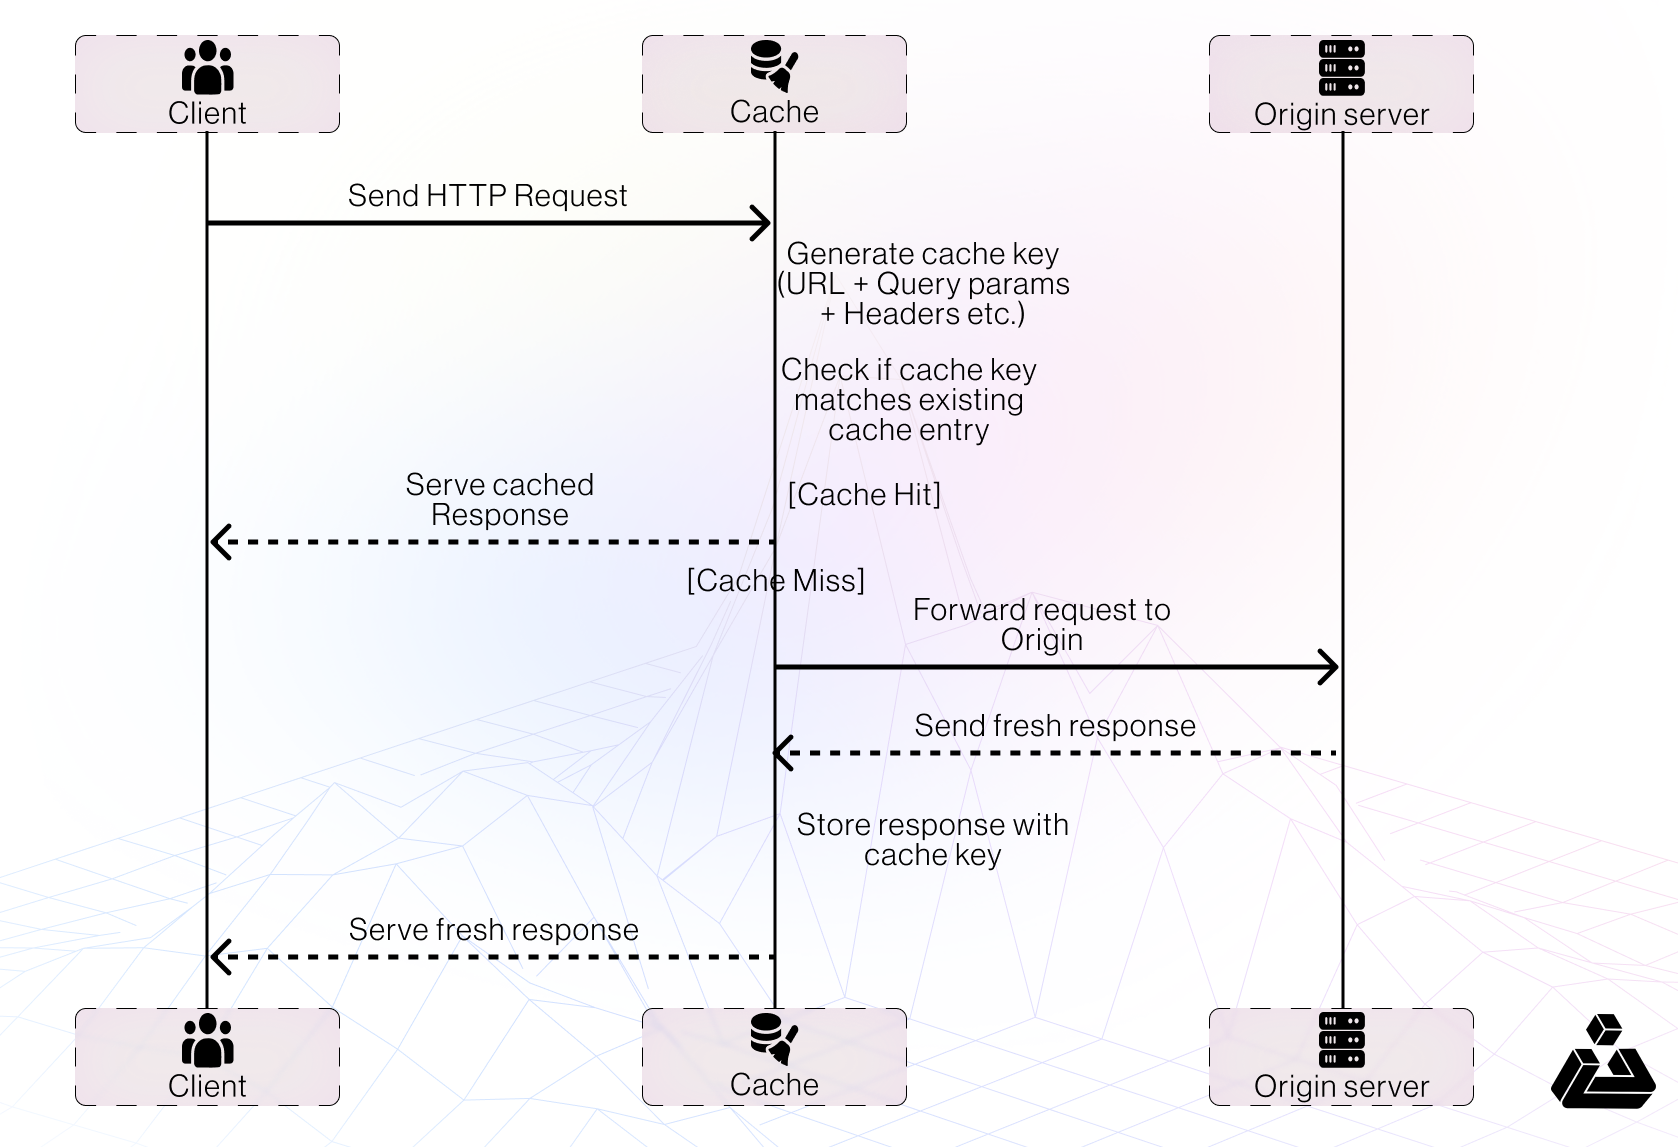
Cache Keys:
When the cache receives an HTTP request, it must decide whether there is a cached response that it can serve directly, or whether it has to forward the request to the origin server. The cache makes this decision by generating a ‘cache key’ from elements of the HTTP request.
Typically, this includes the
- URL path
- query parameters
- headers and content type.
If the incoming request’s cache key matches that of a previous request, the cache considers them to be equivalent and serves a copy of the cached response.
Types of Cache Attacks:
Web Cache Deception?
This attack aims to trick the caching system into storing responses containing sensitive or personal information belonging to an authenticated user. Once cached, this data can then be served to other unauthenticated users accessing the same link. This can lead to unintentional exposure of private data.
Web Cache Poisoning
Web cache poisoning is an advanced technique whereby an attacker exploits the behaviour of a web server and cache so that a harmful HTTP response is served to other users.
Fundamentally, web cache poisoning involves two phases. First, the attacker must work out how to elicit a response from the back-end server that inadvertently contains some kind of dangerous payload. Once successful, they need to make sure that their response is cached and subsequently served to the intended victims.
A poisoned web cache can potentially be a devastating means of distributing numerous different attacks, exploiting vulnerabilities such as XSS, JavaScript injection, open redirection, and so on.

For this Article we will focus on Web Cache Poisoning.
Attacks in the wild:
- Sky.money (Formally MakerDao) was reported a web cache poisoning issue in their frontend page via immunefi for which a substantial bounty was rewarded.
*Reference: https://test.x23.ai/makerdao/discussions/topic/26072/bounty-payout-request-for-immunefi-bug-38567*
How Web Cache Poisoning works
For a Web Cache Poisoning attack to be possible, several preconditions must be met.
- Preconditions for Web Cache Poisoning:
- Certain conditions must be met for the attack to be possible. The attack relies on subtle manipulation of the cache by exploiting discrepancies between:
- Elements influencing the server response, and
- Elements included in the cache key.
- Certain conditions must be met for the attack to be possible. The attack relies on subtle manipulation of the cache by exploiting discrepancies between:
- Step 1: Confirm Resource is Cacheable and Public
The targeted resource must be cached and shared among multiple users.- Analyze HTTP response headers (especially Cache-Control) to check caching behavior.
- Note: Some resources may be cached even without clear headers.
- Step 2: Find an Influential Element Missing from the Cache Key
- Identify a request parameter or header that changes the server response but isn’t included in the cache key.
- Common examples include X-Forwarded-Host, User-Agent, or custom headers.
- If such an element exists, an attacker can inject malicious content into the cached response.
- Step 3: Analyze the Impact of the Injected Payload
- Examine how the injected input is reflected or processed:
- Does it appear directly in the response body?
- Is it validated, sanitized, or left unchecked?
- Does it cause errors, redirects, or unexpected behavior?
- Outcome:
- Depending on the response behavior, the attack can result in different vulnerabilities:
- Stored XSS
- Open redirects
- DoS (Denial of Service)
- Other application-specific logic flaws
- Depending on the response behavior, the attack can result in different vulnerabilities:
There are 3 methods to achieve DOS via Cache Poisoning:
Web Cache Poisoning Scenarios in Web3:
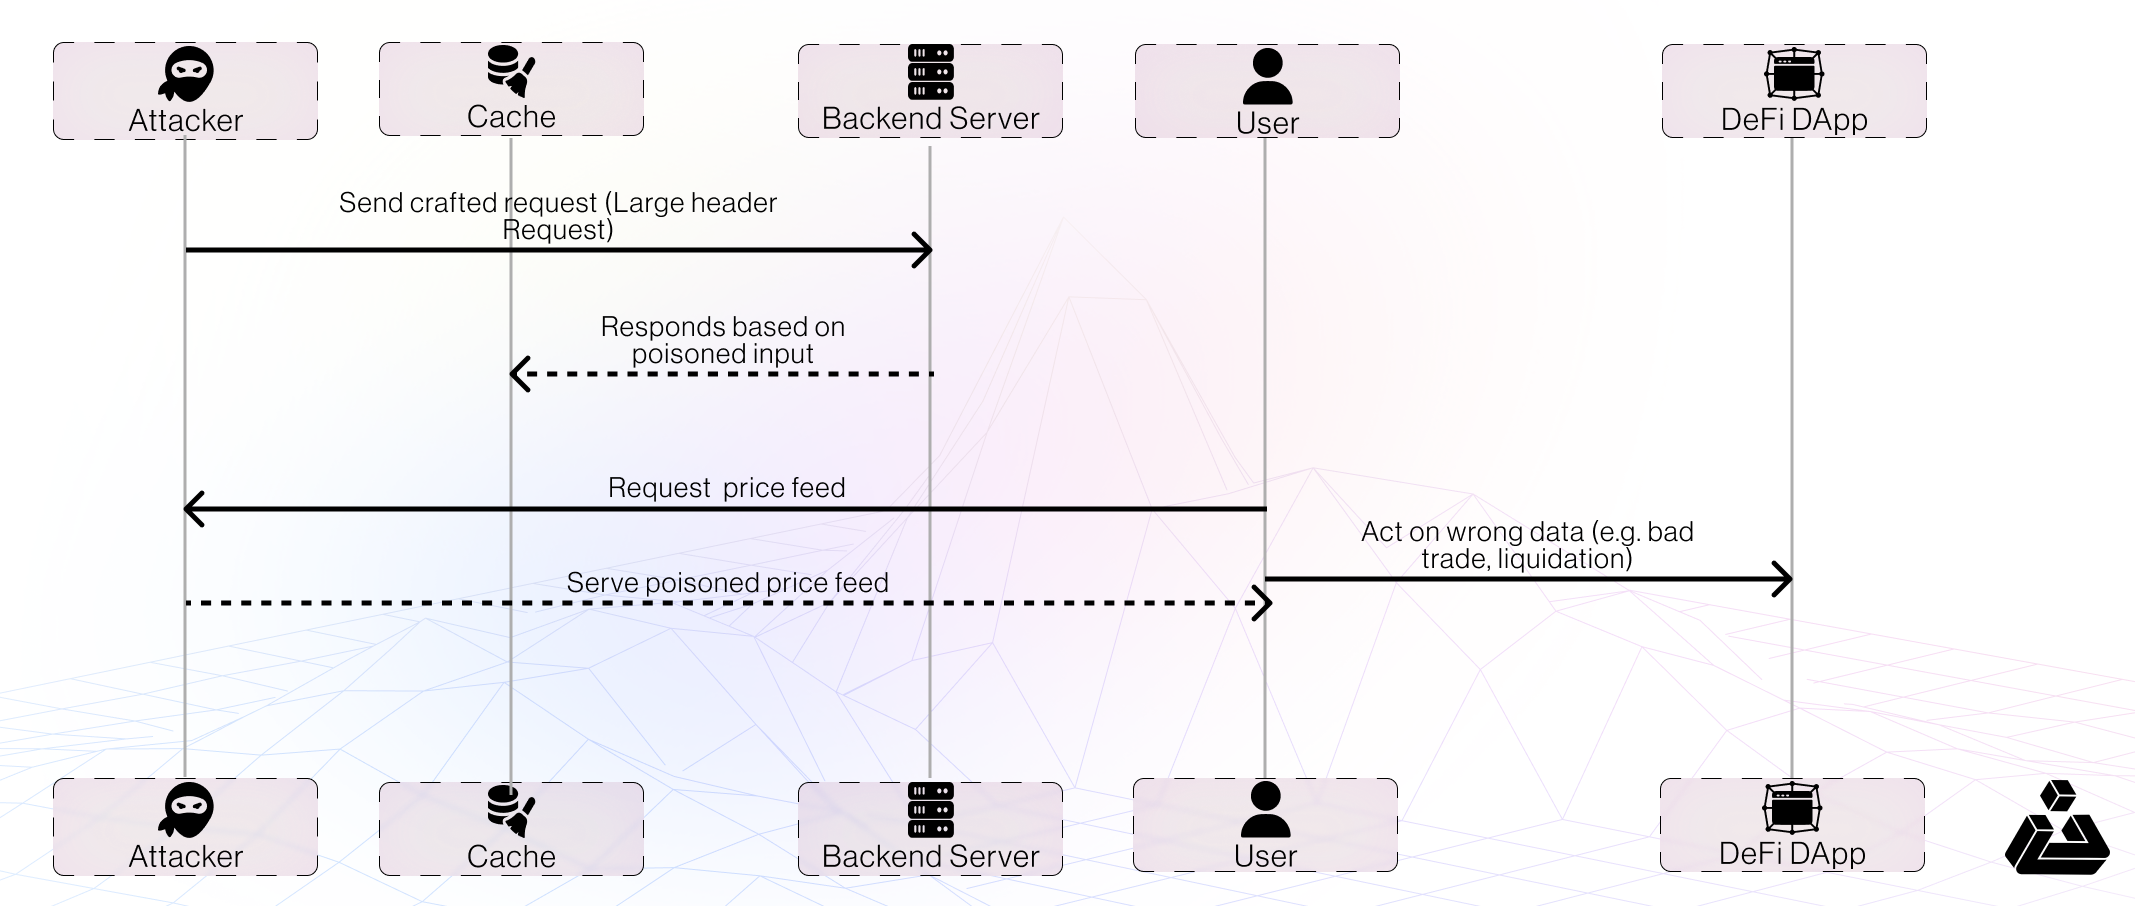
Now we know what Web Cache Poisioing is and how to detect and analyze them. Lets look at a valid scenario pertaining particularly to web3 dapps. We will explore the HTTP Header Oversize(HHO) attack in this.
Scenario: DeFi dApp Price Feed Poisoning via Web Cache Poisoning
- A DeFi dApp frontend displays swap estimates by fetching data from an API endpoint like /api/swap-estimate.
- This API caches responses based only on the path and ignores important headers (e.g., X-Price-Source or custom query params).
- An attacker leverages HTTP Header Oversize (HHO) technique to poison the cache.
- All users who load the DeFi app get wrong price data, leading to:
- DOS on the site
- Users making wrong trading decisions (e.g., buying at fake prices)
- Protocols relying on client-side price feeds for display/UX being misled.
- Potential financial losses or reputational damage.
The lab is available at : https://github.com/mabdullah22/cache_poision_lab
The lab’s setup is straight forward


The dapp is a simple Token Swap (No Real Swapping 🙂 ) .
- When you input your token amount , an api call to the backend is made to fetch the prices.
- You can connect and disconnect your wallet
- You can clear the cache
We will be targeting the /api/swap-estimate api , Since we are using the HHO technique , we need to send a request with a large header.

This curl request basically inflate the headers size. The cache forwards this request including all headers to the endpoint. In our lab I have implemented a header limit of 16000 bytes , exceeding it returns error. This error page with status code 400 Bad Request is now stored by the cache. All subsequent requests targeting the denialed resource are now provided with an error page instead of the genuine content.

To clear the cache use following
The Lab is for demo purpose hence its not perfect , TTL cache is not implemented. Cache is needed to be manually cleared. Following flow should be following for testing purpose.
- Setup the lab
- To verify the calculation click calculate
- Call “curl http://localhost:4000/admin/clear-cache” to clear the cache as TTL is not implemented
- Call

- Click Calculate , as the cache is now polluted , you will get the error. In the real scenario it’s a DOS.
Mitigation Strategies:
- Disable Cache
If you don’t actually need caching on a sensitive endpoint, just turn it off. No cache = no poisoning. It’s the cleanest fix, but not always practical if you care about speed. - Configure Cache Rules Properly
Make sure your cache knows exactly what to store and when to expire it. Poorly configured rules can accidentally cache stuff that should never be shared between users. Check you CDN docs
https://developers.cloudflare.com/cache/cache-security/avoid-web-poisoning/
https://techdocs.akamai.com/api-definitions/docs/caching - Include Certain HTTP Headers in the Cache Key
If your server behavior changes based on headers like User-Agent, X-Forwarded-Host, etc., make sure these headers are part of the cache key. Otherwise, attackers can sneak different behaviors into the same cache bucket. - Limit Cache to Static Files
Only cache stuff that doesn’t change—like images, stylesheets, or static HTML. If your endpoint deals with dynamic, user-specific content, it’s safer to skip caching there altogether. - Validation and Validation
Always validate user input properly and validate your server responses too. Double-check that nothing untrusted is accidentally making it into cacheable responses.
Exploiting IDOR in Web3
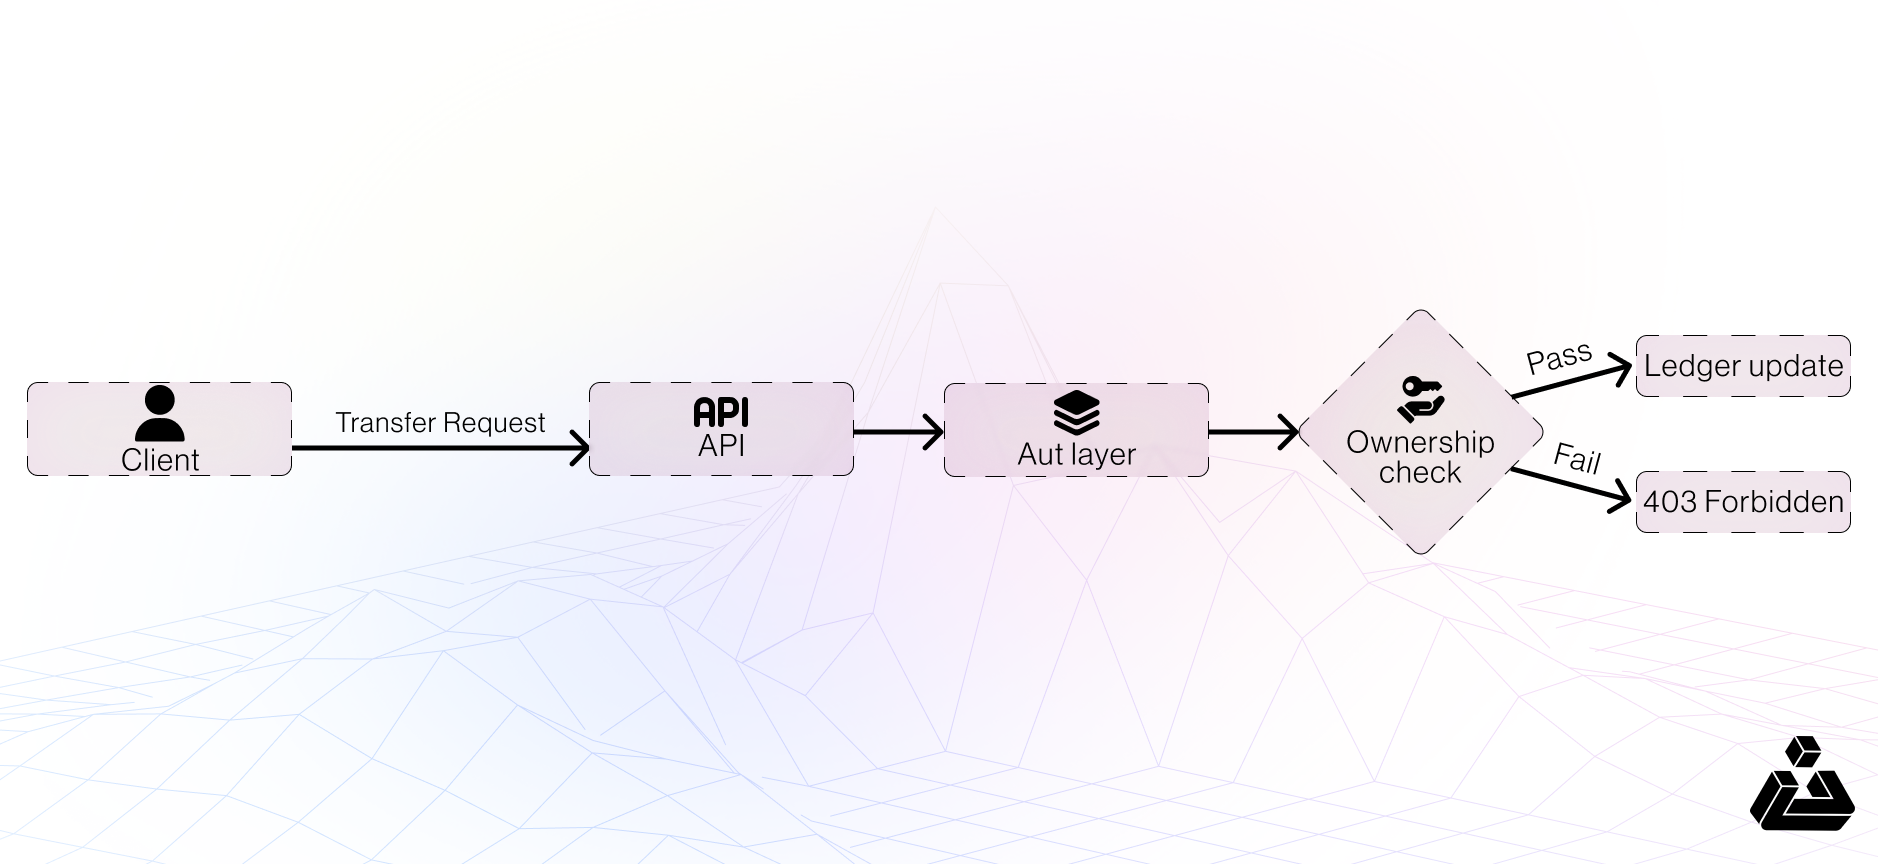
Insecure Direct Object Reference (IDOR) is an age-old authorization flaw: an application exposes a direct identifier (user ID, record ID, file name, etc.) and then fails to verify that the caller is allowed to act on that object. The result can be account takeover, data leakage, or when money is involved outright theft. This article shows how an attacker can drain another user’s balance in an exchange-style Web3 application by tampering with numeric IDs, and then walks through practical defenses.
Quick Refresher: What Is IDOR?

Scenario: Centralized Exchange Transfer Flow
When a user sends funds to another account, the front end builds a JSON request that includes:
Normal Sequence
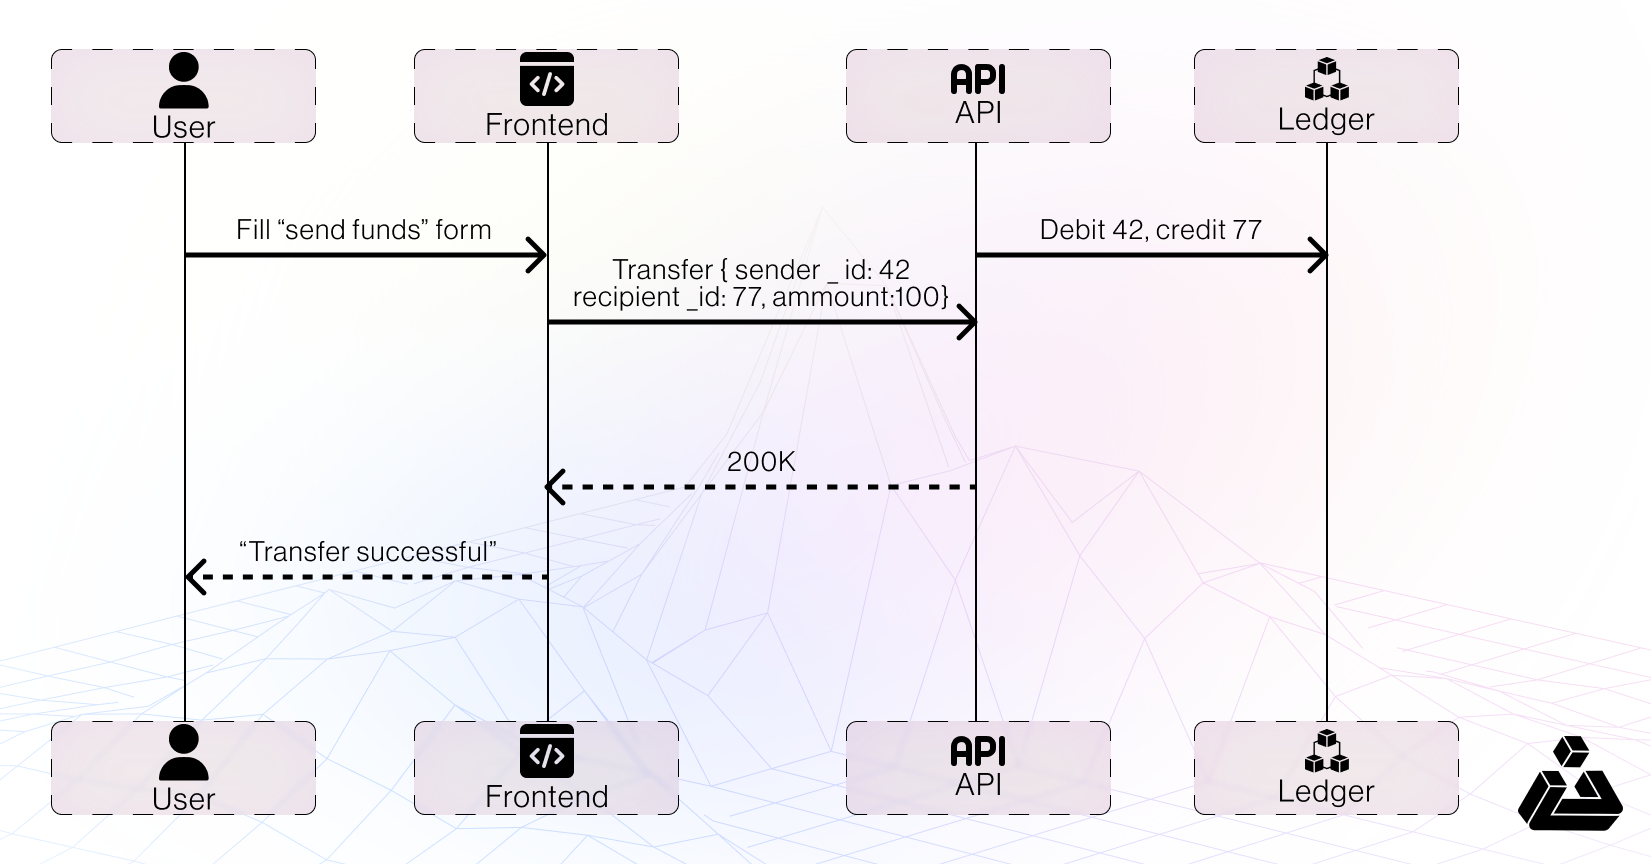
- Pre-conditions for the Attack
- sender_id and recipient_id are directly controllable in the request.
- The API does not re-derive sender_id from the authenticated session.
- User IDs are predictable or discoverable (e.g., integer sequence).
- Attacker can intercept and modify traffic (Burp Suite / proxy / mobile hook)
Step-by-Step Exploit

- Detecting & Confirming the Vulnerability
- Identify the request – Look for /transfer, /withdraw, /updateProfile, etc.
- Change IDs – Substitute another valid user ID.
- Observe result – If the operation succeeds or returns different data, IDOR exists.
- Verify impact – Check ledger/balance endpoints to confirm unauthorized change.
- Consequences
- Unauthorized fund transfers
- Privilege escalation (refunds, order cancellations, profile edits)
- Financial & reputational loss
- Regulatory exposure
- Mitigation Strategies
- Derive critical IDs on the server – Ignore any client-supplied sender_id; pull the user’s identifier from the authenticated session or JWT subject instead.
- Enforce object-level ACL checks – Before every ledger mutation, verify that the requester actually owns or is authorized to act on the referenced object.
- Cryptographically sign sensitive fields – Add an HMAC or elliptic-curve signature covering sender_id, recipient_id, and amount; reject the request if the signature is missing or mismatched.
- Use opaque, unguessable identifiers – Replace sequential integers with UUIDs or hash-based IDs to make brute-force discovery far harder.
- Apply rate limiting and anomaly detection – Flag rapid ID changes, repeated failures, or unusual balance movements and trigger alerts or automatic blocks.
- Key Takeaways
- Even in Web3 ecosystems, classic Web2 authorization bugs like IDOR can empty wallets.
- Keep object identifiers on the server side, or sign them so they cannot be forged.
- Layer ID-removal, ACL checks, and monitoring for a defense-in-depth approach.
IDOR LAB Setup (REPO LINK)
- Prepare the environment
- Install Node.js 14 or newer.
- Clone the lab repository and move into it:
- git clone https://github.com/mabdullah22/idor_lab/
- cd idor-crypto-lab
- Pull the required packages: npm install
- Launch the server (use npm run dev if you like auto-reload while tinkering): npm start
- Open a browser at http://localhost:3000.
- The app boots with four ready-made accounts: alice, bob, charlie, and victim (all passwords are password123).

Why this lab is vulnerable ?
The exchange lets the browser tell the server who is sending money by passing a field called sender_id in the transfer request. Because the backend never checks whether the logged-in user actually owns that ID, anyone can claim to be anyone else simply by changing the number.
Exploit the bug step by step
- Point your browser through Burp Suite (or any intercepting proxy) and switch interception on.
- Log in as Alice. Her dashboard shows she is user 1.
- Start a transfer—pick any recipient, enter a small amount, and press Send Funds.
- Burp catches the outgoing request. In the JSON you’ll see something like:

- Edit the numbers so it reads:

Now you’re pretending that user 4 (the victim) is sending money to user 1 (you).

- Forward the request. The server processes it without question.
- Back on the dashboard, Alice’s balance has grown. The victim’s has shrunk—even though you never had their credentials.
What just happened ?
- Insecure Direct Object Reference: the server trusted sender_id straight from the browser.
- Missing ownership check: it never matched that ID against the authenticated session.
- Client-side trust: critical data that should be server-controlled came from the user.
Bonus:
Web2 Security issues in web3 are not only limited to above , there is a spectrum of issues which are applicable here. Following are some more issues which we have found in our engagement during our audits and penetration testing
Misconfigured RPCs on Validators
Validators are a crucial part of any blockchain ecosystem — they secure the network and validate transactions.
However, misconfigured Remote Procedure Call (RPC) interfaces on validator nodes can introduce serious security risks if left exposed to the public.
Issue Identified:
While doing an audit of Blockchain codebase (ScriptTv) , we found that the JSON-RPC service (which is disabled by default when running ./script start) can be unintentionally enabled on port 16889
without proper authentication.
This opens up critical functionalities via unauthenticated API calls, including:
- Send
- newkey
- listkeys
- unlock_key
- lockkey
- iskey_unlocked
- broadcast_raw_transaction
- broadcast_raw_transaction_async
If an attacker identifies an exposed RPC port, they can perform actions like sending transactions, unlocking keys, and broadcasting raw transactions — potentially leading to complete theft of validator funds.
Exploitation Scenario:
- The attacker continually sends crafted send transactions to the exposed RPC port.
- As soon as the legitimate user unlocks their wallet (even briefly), the queued malicious transaction gets executed, draining funds.
Recommendations:
- Never expose RPC ports to the public unless absolutely necessary.
- Clearly inform users in the documentation about the risks of enabling RPC and provide secure deployment guidelines.
- Strongly recommend placing the RPC service behind an authenticated reverse proxy (e.g., using Nginx with HTTP Basic Auth).
- Highlight that exposed RPC services are an active target of scanning bots and automated exploitation attempts.
References:
https://github.com/BlockApex/Audit-Reports/blob/master/ScripTV Blockchain Audit Report.pdf https://geth.ethereum.org/docs/interacting-with-geth/rpc
https://medium.com/coinmonks/securing-your-ethereum-nodes-from-hackers-8b7d5bac8986
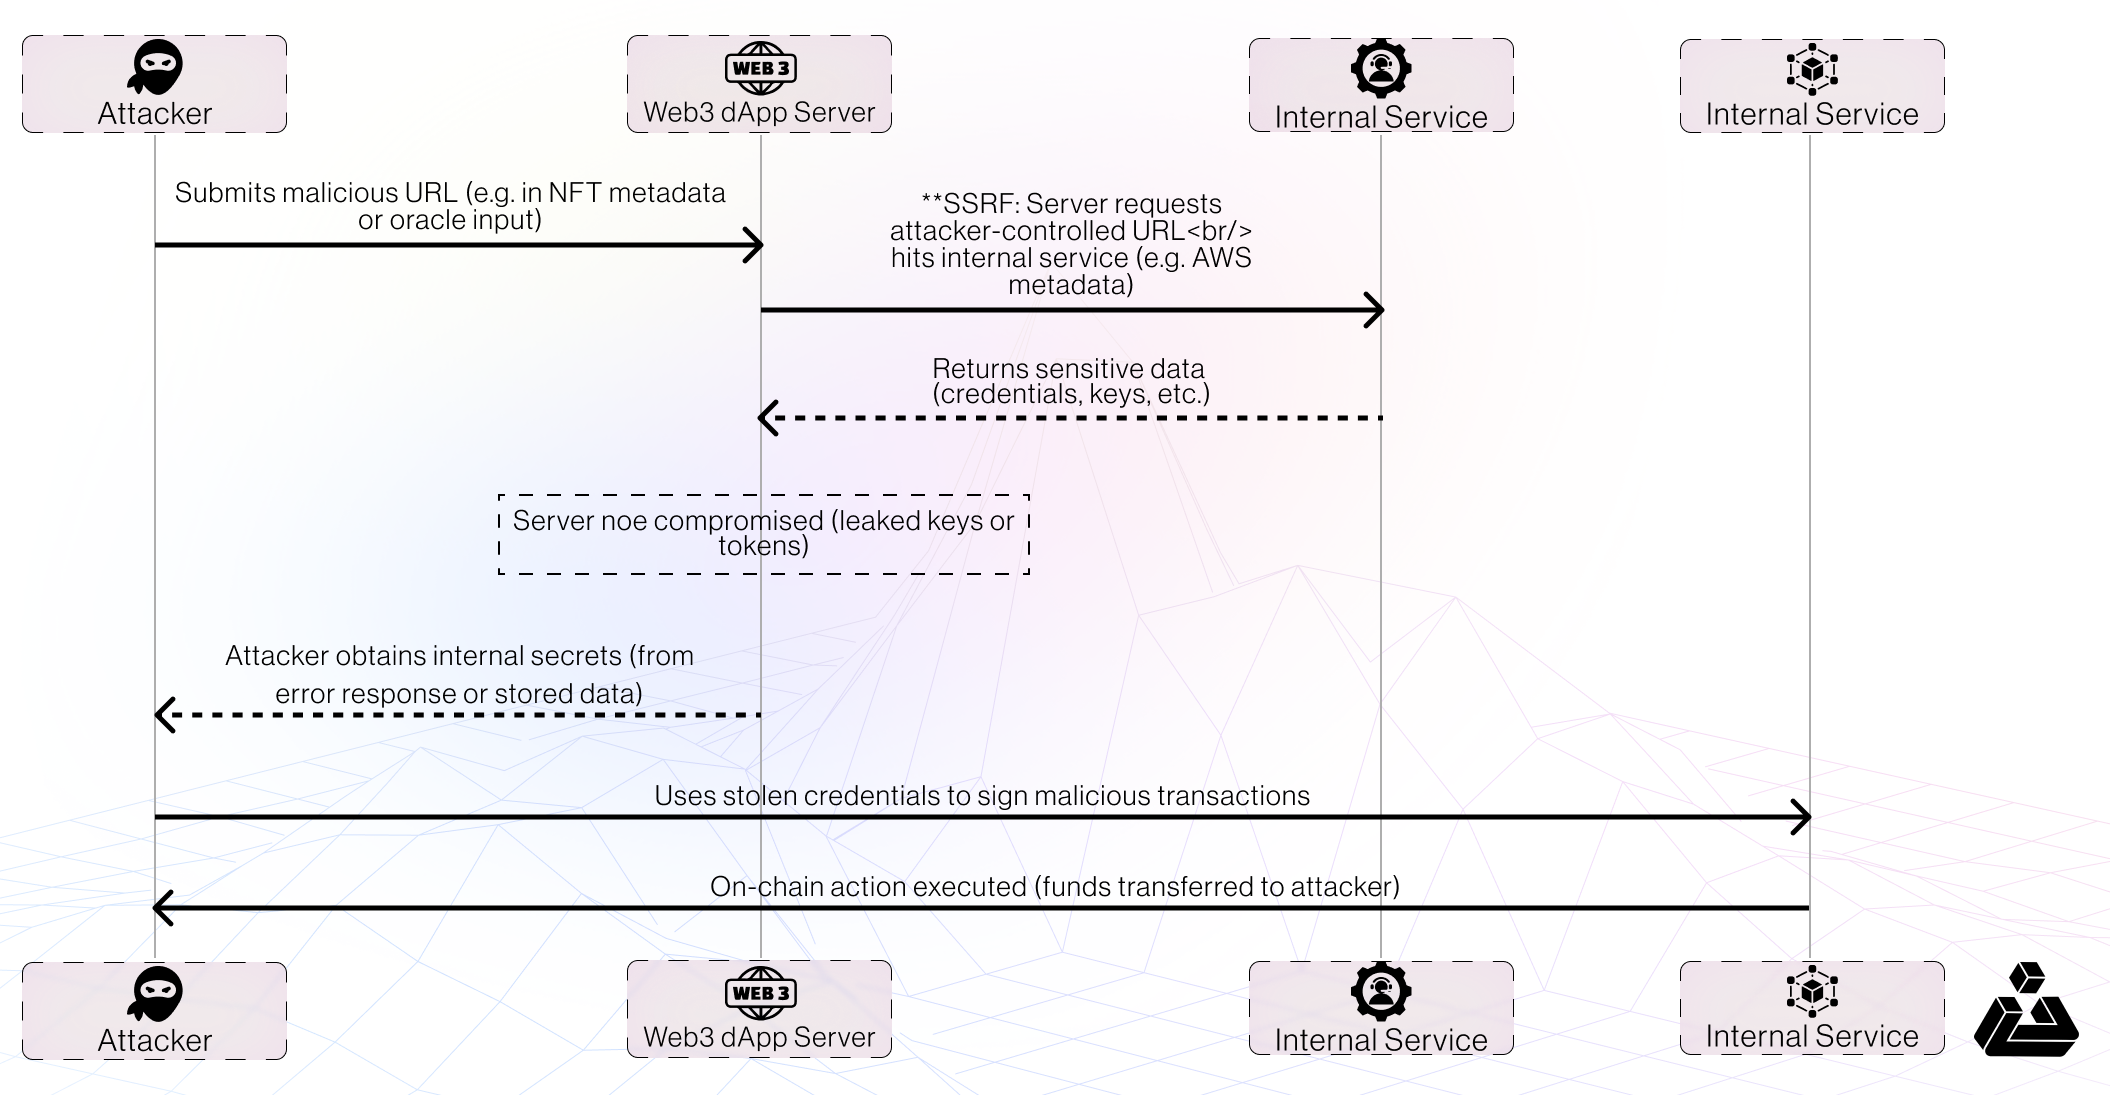
SSRF in Web3 dApps (DeFi & NFT Off-Chain Services)
Server-Side Request Forgery (SSRF) lets an attacker trick a server into making HTTP requests on its behalf. In a Web3 context, this can target internal services (like cloud metadata endpoints, private APIs, or even local blockchain nodes) that are not normally exposed. If a DeFi or NFT platform’s backend fetches user-provided URLs (for price oracles, NFT metadata, image proxies, etc.), a crafty attacker can supply an internal URL and cause the server to perform unintended actions.
Issues In the Wild
- SSRF via Image Proxy (DeFi Frontend): In 2022, researchers discovered a flaw in Netlify’s image optimization library used by many crypto sites (e.g. PancakeSwap, Gemini) . The bug allowed XSS + SSRF – meaning an attacker could make the site’s server fetch any URL and read the response. This could be abused to target internal endpoints or cloud infrastructure. For example, an attacker on a DeFi site could craft an image URL that points to AWS’s internal metadata service (e.g. http://169.254.169.254/…) . The server would unsuspectingly request this URL, leaking sensitive info like AWS keys .
Reference: https://samcurry.net/universal-xss-on-netlifys-next-js-library - **Cargo.build SSRF:** NFT marketplaces often fetch token metadata or images from URLs provided in the token’s metadata. If not validated, an attacker can make a get request with image URI to an internal address (like an internal API or file:// URI). A vulnerable marketplace backend might dutifully fetch it, inadvertently exposing internal files or endpoints. I found same issue in cargo.build whereby I was able to gain access to the cloud infrastructure of the NFT marketplace
Reference: https://medium.com/@mahitman1/hacking-a-nft-platform-56fc59479d3b
On-Chain Impact: Unlike typical SSRF (which “only” reads server data), SSRF in Web3 can cascade into financial loss. By leaking keys or calling internal blockchain APIs, attackers can forge transactions, alter oracle values, or drain hot wallets. Essentially, the Web3 platform’s own server becomes the attacker’s proxy to perform malicious blockchain operations. A recent study noted that a large share of Web3 hacks actually originate from such Web2 infrastructure flaws – highlighting that SSRF and similar bugs are not just theoretical.
SSRF Exploit Flow
Below is a generalized flow of an SSRF attack on a Web3 dApp’s off-chain component, leading to an on-chain exploit:
Conclusions:
While Web3 heralds a new era of decentralization and trustless interactions, it’s imperative to recognize that its foundation often rests upon traditional Web2 infrastructures. The incidents involving Time.fun, Mixin Network, and Curve Finance underscore a recurring theme: vulnerabilities in off-chain components can compromise the integrity of entire decentralized systems.
These breaches weren’t the result of flaws in smart contract logic but stemmed from overlooked Web2 vulnerabilities—be it unsecured APIs, misconfigured databases, or compromised DNS records. Such oversights have led to significant financial losses and have shaken user confidence in decentralized platforms.
To fortify the Web3 ecosystem against such threats, a holistic security approach is essential:
- Comprehensive Audits + Penetration Testing: Extend security assessments beyond smart contracts to encompass all off-chain components. Perform regular Penetration testing.
- Secure Development Practices: Implement stringent coding standards and regular code reviews for Web2 elements. Implementation of SDLC can increase the security many folds.
- Access Control and Monitoring: Enforce strict access controls and continuously monitor for unauthorized activities across all systems.
- Incident Response Planning: Develop and regularly update incident response plans to swiftly address potential breaches.
- Education: Human is often the weakest link when it comes to cyber attacks , education on secure practices is very important. Employees and owners should keep themself upto date on the cyber attacks. With AI creeping, defensive and offensive cyber security is going to change alot.
References:
- https://github.com/mabdullah22/cache_poision_lab
- https://github.com/mabdullah22/idor_lab
- https://fr3ak-hacks.medium.com/the-1-7-billion-blind-spot-how-web2-flaws-are-wrecking-web3-projects-from-the-inside
- https://it.tenable.com/blog/identifying-web-cache-poisoning-and-web-cache-deception-how-tenable-web-app-scanning-can-help
- https://cpdos.org/
- https://developers.cloudflare.com/cache/cache-security/avoid-web-poisoning/
- https://portswigger.net/web-security/access-control/idor